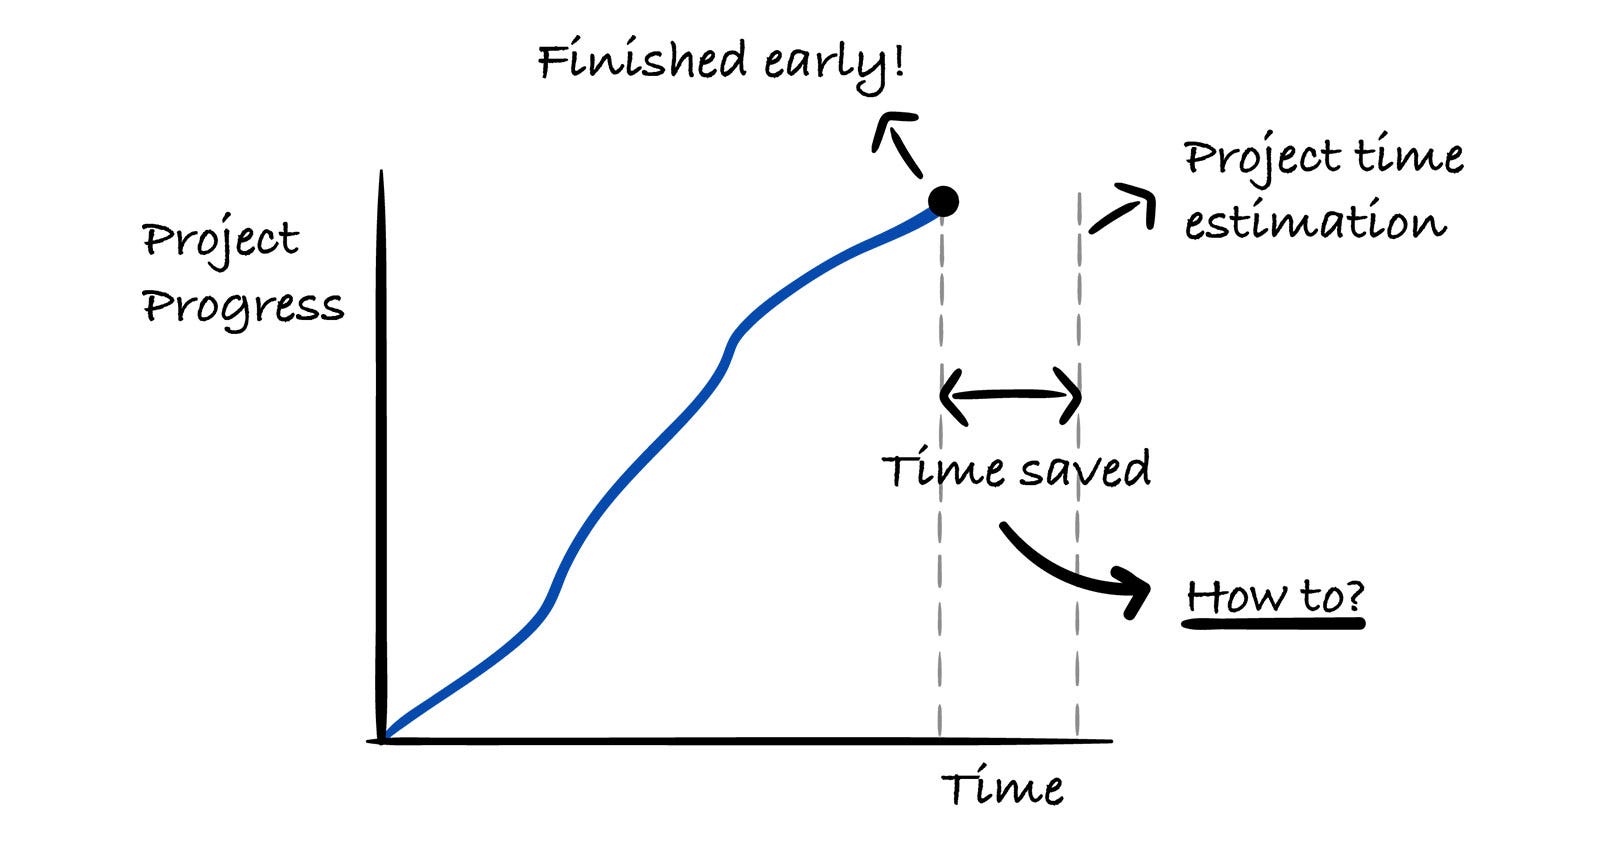
How to Finish Engineering Projects Early Without Added Stress
A real-world case study on using the critical chain methodology to finish projects early without added stress.
This week’s newsletter is sponsored by Larridin, an AI-native developer intelligence platform.
Measure AI’s impact on engineering.
Claude writes code 10x faster than a human. So why is engineering productivity up 20%, not 200%?
Engineers spend only 30-40% of their time actually coding. The rest goes to deployments, sprint planning, admin overhead, support questions, design reviews, incident response, and everything in between.
Until now, we’ve had no way to map and measure where that invisible work actually goes. Larridin changes that. Mapping how engineering work flows across your org, surfacing the blockers and friction that drag on productivity, and showing you exactly what to fix.
Larridin delivers complete 360° developer intelligence for AI-native engineering teams. From traditional developer productivity metrics to AI-era measures like Agent Effectiveness scores.
Thanks to Larridin for sponsoring this newsletter, let’s get back to this week’s thought!
Intro
I like to say that finishing projects in software engineering is more like an art than a clear blueprint. Every team and project is different and what works for one may not for the other.
There are many ways to approach engineering projects. Today, we’ll go through a case study on what worked well for Karol Wójciszko, Senior Engineering Manager, Webinterpret.
It’s a bit of an unconventional approach, and that’s exactly what makes it valuable and interesting to read.
Let’s introduce our guest author and get started!
Introducing Karol Wójciszko
Karol Wójciszko is a senior engineering manager for Webinterpret, running multiple engineering teams. He also writes about engineering leadership topics in his newsletter called Engineering Leader’s Playbook.
Today, Karol will share a case study from a project he ran with an adapted version of critical chain project management. It’s a method from Eliyahu Goldratt’s Critical Chain, originally designed for manufacturing and construction.
Let’s start!
1. What Critical Chain Is and Why It Works So Well in IT
The core mechanic in critical chain project management is almost provocatively simple. You take your team’s estimates, cut them all by 50%, and call these new numbers “aggressive but achievable.”
The time you removed from each task doesn’t disappear. It becomes your project buffer: a shared pool of time that the entire team draws from.
Let’s say an engineer estimated a task to take four days; they now have two days to finish it. If they do it in two days, you just put two days into the project buffer. If they finish in three days, there’s a day in the buffer.
And if they do it in five? They’ve used three days from the buffer, which is also fine. Nobody gets punished. You’re tracking how much total buffer the project is consuming versus how much actual progress has been made.
Why does this work? Because of Parkinson’s Law.
You’ve probably heard of it: Work expands to fill the time available. If you give someone four days for a task that they could realistically finish in less than two, they will almost always use the full four days.
Not because they’re lazy or wasting time; it’s just how human brains work. We fill the available time. We polish things that don’t need polishing. We revisit decisions. We context-switch because “there’s still time.”
The result is a painful asymmetry in every project: Early finishes get absorbed silently, but delays are loud and visible.
Think about it. When was the last time an engineer finished a task a day early and that extra day actually benefited the project timeline? It almost never happens. The saved time evaporates into a longer code review, an extra refactor, a coffee break.
But when a task takes one extra day? That shows up immediately in your burndown chart. Everyone notices.
Critical chain flips this dynamic. By setting aggressive targets, you create conditions in which early finishes are actually captured. Some tasks will run over the aggressive estimate. That’s to be expected. It’s what the buffer is for.
But the tasks that come in early now benefit the whole project instead of disappearing.
The two rules that make critical chain work
There are two rules that are nonnegotiable for this method to work.
Rule 1: Absolutely do not give penalties for going over the aggressive estimate
I mean “penalties” both formally and informally: no performance notes, no disappointed looks, no passive-aggressive “so, task 7 took a bit longer, huh?” in a standup. The engineer did their best.
The aggressive estimate was designed to be missed sometimes. If you create any kind of penalty, even subtle social pressure, you’ll destroy the entire method. People will start padding estimates again, and you’ll be back to square one.
This is harder than it sounds. As a manager, you need to genuinely not react when someone takes five days on a task estimated at two and a half. Your body language matters. Your tone matters. The team is watching.
Rule 2: Track the buffer, not individual tasks
The question is never “Did Sarah finish task 7 on time?” The question is always “How much total buffer has the project consumed versus how much total progress have we made?” This is a team-level metric.
Individual task overruns don’t matter as long as the overall project buffer is healthy.
This also builds team spirit. Now it’s not about individual performance. It’s about the collective mission. Some tasks will finish early, and some will finish late. The team wins together.
Adapting it for story points (yes, I know)
I need to address the elephant in the room: story points.
Classic critical chain uses time estimates. But most software teams estimate in story points (SPs), which is a measure of complexity rather than time. Purists will tell you that you can’t convert story points to time. And technically they’re right.
But you can calculate how long your team historically takes to finish tasks of each size. That’s not a theoretical conversion; it’s empirical data. And it’s good enough for critical chain to work.
Here’s what I do: I pull all completed tasks from the previous quarter and calculate the median completion time for each SP value. Whether a task had 2 SPs or 5 or 8 or any other amount, I still take the median completion time, which scales with the points.
Why median and not average? Because the median filters out outliers. That one task that took 14 days because an engineer went on vacation mid-project? The median ignores it; the average doesn’t. The median gives you a naturally tighter, more aggressive baseline, which is exactly what we want.
A critical point: This entire calculation happens outside of the team. I pull the data, I compute the medians, I set up the buffer. Engineers don’t need to think about any of this. They just do their normal work. This is homework for the manager, not an extra burden on the team.
Once you have the median times, you cut them by 50%. That’s your aggressive estimate for each task. The sum of everything you cut becomes your project buffer.
I use 50% in this case study, but you can start gentler, such as 30% or even 20%. The principle is the same. You can adjust the aggressiveness as you and the team get comfortable with the method.
2. Case Study: From Red Zone to Early Finish in 4 Weeks
Let me walk you through an actual project week by week, so you can see how this plays out in practice.
Our starting conditions:
17 tasks, estimated at 70 SPs total
A team of three: two senior engineers, one midlevel
A clearly defined scope (fixed epic)
Buffer after 50% cut: 35 SPs
The math behind buffer tracking
In the case study below, I track two numbers week by week:
buffer consumption and
project progress.
Here’s how I calculate each one.
Buffer consumption is based on the difference between the aggressive estimate and the actual cycle time for each completed task.
When a task is closed, I know how long it actually took. I compare that against the aggressive estimate I assigned during planning. The difference tells me how much buffer that task consumed or saved.
A quick example: If the aggressive estimate for a task was 2 days, but the task actually took 3 days to complete, that task consumed 1 day of buffer. If it took only 1.5 days, it saved half a day of buffer.
At the end of each week, I add up the total buffer consumed across all completed tasks and express it as a percentage of the total project buffer. So if used 2 days out of a buffer of 10 days, we used 20% of the buffer.
Project progress is simpler. It’s the percentage of delivered story points relative to the total scope. If the project has 70 story points in total and the team delivered 7 this week, progress is 10%.
Are we on track? I compare the two numbers. If buffer consumption is 26% but project progress is only 16%, we’re 10 percentage points, or 62.5%, behind.
The project is consuming buffer faster than it’s producing results. If progress is ahead of buffer consumption, we’re in good shape.
One thing I want to call out here: I deliberately keep the math simple.
You might notice there’s no weighted scoring, no statistical modeling, no confidence intervals. That’s intentional. The foundation of this entire method is a median for cycle time, which is already an approximation.
We’re working with uncertainty from the start. There’s no point in building sophisticated calculations on top of an uncertain baseline. That’s just stacking assumptions on assumptions.
I treat these numbers as a guideline, not a guarantee, and the method works precisely because it embraces that simplicity instead of pretending to be more precise than it is.
Week 1: Red alert
Buffer consumed: 26% | Progress: 16%
Buffer consumption was 10 percentage points ahead of project progress (26%-16%). The gauge chart went straight to red.
Here’s the interesting part: By traditional velocity/throughput metrics, this was a completely normal first week. If I’d been running this project with a standard burndown chart, nobody would have raised an eyebrow. The team was delivering at a typical pace for Week 1.
But the critical chain gauge doesn’t care about typical. It cares about the ratio of buffer consumed to progress made. And that ratio was bad. We were burning through the buffer faster than we were completing work.
So I called a quick retro, just a 30-minute conversation about what was slowing us down. The answer was clear: Several key tasks lacked clarity. Requirements were ambiguous, a few diagrams were missing, and engineers were spending time figuring out what to build instead of building it.
We spent an afternoon with the project manager clarifying requirements, updating diagrams, and resolving open questions. This wasn’t anything dramatic; it was the kind of thing that happens in every project. The difference is that we caught it in Week 1, not Week 3.
And here’s what’s worth emphasizing: No other methodology would have raised an alarm at this point.
By velocity/throughput standards, we were on track. This looked like a perfectly normal first week. No burndown chart would have flagged anything. We would have cruised along for another two to three weeks before realizing that unclear scope was silently eating our time.
Before the retro, nobody on the team thought scope clarity was the bottleneck. It wasn’t obvious. But when we sat down and asked ourselves what was constraining us the most right then, that was the answer.
And because the critical chain gauge is so sensitive to the buffer-to-progress ratio, we got that signal in Week 1. We fixed it at the earliest possible moment.
Without this early alarm, we would have learned about the problem much later, when the damage was already done and much harder to recover from.
Week 2: Recovery
Buffer consumed: 46% | Progress: 41%
The gap narrowed to 5 percentage points, buffer consumption at 46%, progress at 41%. The clarity fix from Week 1 was paying off.
The gauge chart was sitting around the yellow-red boundary - still not great, but the trend was clearly moving in the right direction. We were slowly clawing our way back.
At this point, my job was simple: observe, don’t interfere. The team was doing their thing, the fixes were working, and adding more management overhead would only slow them down.
This is one of the things I like about the method: It tells you when to act and when to leave the team alone. Yellow zone? Watch. Green zone? Forget about it. Red zone? Intervene. There’s no ambiguity about it.
Week 3: First win
Buffer consumed: 63% | Progress: 70%
For the first time, progress was ahead of buffer consumption, by 7 percentage points. We were ahead of the historical median.
This was a milestone worth celebrating!
I shared the numbers with the team and we acknowledged the progress. Not every task had been finished within the aggressive estimate. Several went over. But that was fine. The overall project was ahead because enough tasks came in early to more than compensate.
This is the moment the team starts to really get the method. They see that individual task overruns don’t matter. What matters is the collective result. It shifts the mindset from “I need to finish my task on time” to “we need to finish the project on time.”
Week 4: Done early
Buffer consumed: 83% | Progress: 100%
Project completed. We used 83% of the buffer to deliver 100% of the scope. That 17 percentage point gap was pure time savings.
I don’t have a parallel universe in which we ran this same project with a different methodology, so I can’t tell you definitively that we would have been 17% slower without critical chain.
But looking at the data, one thing is clear: The Week 1 red alert alone probably saved us at least a week of delay. And the overall pace of work was noticeably tighter than what I typically see from the same team on standard projects.
3. Track Project Progress in 10 Minutes a Week
You saw the gauge chart in action during the case study: red in Week 1, yellow–red in Week 2, green in Week 3, and yellow in Week 4.
Here’s how I actually define those zones and what I do with them.
Defining the zones
The thresholds are based on two reference points you already have: your aggressive estimates (median cut by 50%) and the raw historical median. The gauge tracks the difference between buffer consumption and project progress, measured in percentage points.
🟢 Green = Progress is ahead of buffer consumption, tracking at or below the aggressive estimates. You’re on track to finish early. Close the spreadsheet, go do something else.
🟡 Yellow = Buffer consumption is roughly in line with progress, somewhere between your aggressive estimates and the historical median. You’ll probably finish on time, but not early. Keep an eye on the trend - is it improving or worsening?
🔴 Red = buffer consumption exceeds progress by more than 5 percentage points above the historical median. At this pace, you’ll blow through the buffer before completing the scope. Time to act - call a retro, find the constraint, fix it..
You can adjust these thresholds to your own risk tolerance. Mine are calibrated to my teams. The exact numbers aren’t sacred. What matters is having clear, visual triggers that remove ambiguity about when to intervene.
The weekly ritual
My entire engagement with this method during a project looked like this:
Refresh the data (I pulled the completed tasks from Jira into the spreadsheet).
Look at the gauge chart:
Green: I’m done for the week.
Yellow: I note the trend, and then I’m done for the week.
Red: I schedule a 30-minute retro.
That’s it. No daily tracking, no manual data entry, no complex dashboards. One chart, one look once a week for about 10 minutes total.
When this method doesn’t work
I don’t apply the critical chain to every project. Here are some team compositions where it consistently fails:
Junior-heavy teams
I’ve tried this, and it backfired. Juniors take the aggressive estimates personally. Even when I explicitly say “no penalties,” even when I demonstrate it with my behavior, they stress about missing the target.
It creates anxiety instead of motivation. The method requires a certain level of professional maturity to work. People need to understand, both emotionally and intellectually, that missing the aggressive estimate is fine.
Burned-out teams
If your team is already stretched, adding aggressive estimates, even with a buffer, even with no penalties, will feel like more pressure. Read the room. If people are exhausted, this isn’t the time for productivity experiments.
Very senior teams on familiar codebases
I’ve also struggled with teams where everyone is senior and has been working on the same domain for years. Their estimates are already tight.
There’s not enough slack in their estimates for the method to create leverage. They’re already working close to their actual pace, so cutting estimates doesn’t produce meaningful buffer.
Undefined or shifting scope
This is the fundamental prerequisite. You need to know the full list of tasks upfront to calculate the buffer. If you’re dealing with an epic where new tasks keep getting added mid-sprint or where the PM is still figuring out requirements as you go, stop.
Fix the scope first, then consider critical chain. It works for defined-scope projects, like epics, milestones, and clearly scoped features. It doesn’t work for ongoing maintenance or discovery work.
I run this method maybe once a quarter, sometimes once every six months. I pick projects for which the deadline matters and the scope is locked. It’s a precision tool, not a daily driver.
The compound effect
There’s a bonus that becomes visible over time.
If you apply this method periodically, say, once a quarter, you’ll notice something interesting: Your team’s median completion times actually shrink. The feedback loop tightens.
Engineers internalize the habit of working with focus instead of letting tasks naturally expand. Not because you’re pushing them but because they’ve experienced what it feels like to finish tasks faster, and they liked it.
After about six months of periodic use, you’ll probably need to recalculate your medians. Your historical data will show shorter completion times, which means your aggressive estimates become even more aggressive. And the cycle continues.
That’s the real win. Not finishing one project early, but building a team that habitually works with intensity and focus without the stress.
One more thing: I know the orthodox critical chain community might push back on my adaptations of using story points instead of pure time estimates, using medians instead of single-point estimates, and modifying the buffer thresholds. I get it.
But these modifications are what make the method practical for modern software teams. The original theory is brilliant. Implementation must meet your team where they are.
It took me several iterations across multiple projects to get this setup right. I needed to figure out which Jira automations would work, how to structure the spreadsheet so it wouldn’t need manual input, and how to make the gauge chart update itself.
Below, I walk through the exact configuration step by step: how to compute your median completion times, set up automatic due dates in Jira (with the automation code), and connect a self-updating spreadsheet for buffer tracking.
I’m also including a ready-to-use template with all formulas from the case study above. If you’re planning to try this on your next project, it’ll save you a few hours of trial and error.
4. How to Configure Everything So It Calculates Itself
The whole philosophy behind my setup is the team does nothing extra. No additional tracking, no spreadsheets to fill, no status updates beyond the normal board workflow.
Engineers just move tickets across the board as they normally would. Everything I need calculates itself.
Here’s how.
Step 1: Calculate your median completion times
Export completed tasks from the last quarter (or or last four months) from Jira. You want tasks that are fully done, status “Done” or equivalent.
Group the tasks in the spreadsheet by SP value: Put all 1-point tasks together, all 2-point tasks, all 3-point tasks, all 5-point tasks, and so on.
One of the reasons I like Fibonacci sizing is because you end up with a manageable number of buckets to analyze.
For each group, calculate the median time from when the task moved to “In Progress” to when it was resolved. Remember: not average, median. The average gets skewed by that one task that took 14 days because of a dependency blocker or a vacation. The median gives you a clean, representative number.
You have a few options for doing this practically:
Spreadsheet export
Export your Jira tasks to a CSV or connect Google Sheets to Jira. Then a pivot table will calculate medians in about 10 minutes. Seriously. This sounds like it should take hours, but if you know your way around a pivot table, it’s fast.
Jira plugins
There are plugins like Time in Status (free tier available) that can show you these distributions directly. When I started, I used one of these. Now I find the spreadsheet approach faster for my workflow.
Monte Carlo simulation
Some teams already use Monte Carlo diagrams for forecasting. These show similar distributions that you can use as a baseline for your aggressive estimates.
A custom tool
We’re in 2026. You can build a simple script using the Atlassian API to pull this data and calculate medians automatically. I have several custom tools like this for team management, written with just a few prompts in Claude Code. (Maybe I’ll show how I build these in a future article.)
Whatever method you choose, by the end of this step you’ll have a table like:
1 SP → median completion time: X days
2 SP → median completion time: Y days
3 SP → median completion time: Z days
5 SP → median completion time: W days
Cut these by 50% (or 30%, or 20%, your choice). Those are your aggressive estimates. The sum of everything you cut is your project buffer.
Step 2: Set up automatic due dates in Jira
This is the key automation that makes the method low maintenance.
Create a Jira automation rule so that when a task moves to “In Progress,” Jira automatically sets the due date based on its story point value. The due dates are your aggressive estimates.
For example, with a 50% cut:
1 SP → due date = today + 1 day
2 SP → due date = today + 2 days
3 SP → due date = today + 2.5 days
5 SP → due date = today + 4 days
Here’s how to set this up in Jira Automation (Project Settings → Automation → Create Rule):
TRIGGER: Field value changed → Status → to “In Progress”Then add a series of if/else conditions branching on the Story Points field, each setting the due date accordingly. The rule logic looks like this:
TRIGGER: When status changes to “In Progress”
IF Story Points = 1
→ Set Due Date to {{now.plusBusinessDays(1)}}
ELSE IF Story Points = 2
→ Set Due Date to {{now.plusBusinessDays(2)}}
ELSE IF Story Points = 3
→ Set Due Date to {{now.plusBusinessDays(3)}}
ELSE IF Story Points = 5
→ Set Due Date to {{now.plusBusinessDays(4)}}
ELSE IF Story Points = 8
→ Set Due Date to {{now.plusBusinessDays(6)}}Note: Jira updates its automation UI frequently. It might look a bit different by the time you’re reading this.
A few more notes on the setup:
Use plusBusinessDays instead of plusDays so weekends don’t count against the engineer. Nobody wants a due date landing on Saturday.
Adjust the day values to match your own medians cut by your chosen percentage. The numbers above are examples from my case study.
You can also handle this with a single Lookup table action if your Jira plan supports it. You’ll map story point values to day offsets in one place, making it easier to maintain.
You hardcode these values once. Update them roughly every six months if your team’s speed improves, which it likely will.
The due date must be visible on the board. This is important.
When an engineer picks up a task, they should immediately see the aggressive target. Not as pressure, as information. You want their mindset to be “This is how long it would take if everything goes perfectly. Let’s see how close I can get.”
And you’ll see something interesting: Many engineers actually enjoy the challenge. There’s genuine satisfaction in hitting an ambitious target. I’ve seen real joy on people’s faces when they finish a task within the aggressive estimate. It’s like a personal best.
But if they don’t hit it? Nothing happens. No consequences. No comments. That’s the deal, and you have to honor it every single time.
Step 3: Connect a spreadsheet for buffer tracking
I connect Google Sheets to Jira using a JQL connector. My query pulls only tasks with status “Done” from the specific epic I’m tracking.
The JQL looks something like:
project = [YOUR_PROJECT] AND status = Done AND “Epic Link” = [YOUR_EPIC]Once the tasks are imported into the spreadsheet, I calculate:
Cycle time for each task: The difference between the resolved date and the date it moved to “In Progress”
Buffer consumed: The sum of time overruns beyond the aggressive estimates
Progress: Percentage of total scope completed
Gauge chart zone: Green, yellow, or red based on the buffer-to-progress ratio
Once a week, I refresh the JQL import. The new completed tasks flow in, all calculations update automatically, and the gauge chart tells me whether I need to do anything.
Total weekly time: about 10 minutes. Refresh, look, decide.
It contains all the calculations from the case study, buffer tracking, gauge chart zones, cycle time formulas, everything. You can duplicate it and plug in your own data.
🎁 Spreadsheet template with all the formulas
You can download my spreadsheet template. It contains all the calculations from the case study: buffer tracking, gauge chart zones, cycle time formulas, and so on. Duplicate it and plug in your own data.
Conclusion
Critical chain project management is one of the most underused tools in engineering management. Adapted properly, it gives you three things that are hard to get from any other methodology:
Early warning
The buffer-to-progress ratio catches problems in Week 1 that burndown charts won’t surface until Week 3. That’s the difference between a fixable issue and a project delay.
Captured time savings
By setting aggressive estimates, you neutralize Parkinson’s Law. Tasks that would have quietly expanded to fill their allotted time now generate actual savings for the project.
Low overhead
Once set up, the method runs on 10 minutes of your time per week. The team does nothing extra. No additional tracking, no extra ceremonies, no new tools to learn.
The setup does take some upfront work. You’ll need to calculate medians, configure automations, and build the spreadsheet. But after that? You’re just looking at a gauge chart once a week and deciding whether to act or not.
Pick one defined-scope project. Set it up. Run it for four weeks, and see how it goes. The bar doesn’t have to be “not late.”
Last words
Special thanks to Karol for sharing his insights with us! Make sure to sign up to his newsletter Engineering Leader’s Playbook. To learn more about Karol, check him out on LinkedIn.
Liked this article? Make sure to 💙 click the like button.
Feedback or addition? Make sure to 💬 comment.
Know someone that would find this helpful? Make sure to 🔁 share this post.
Whenever you are ready, here is how I can help you further
Join the Cohort course Senior Engineer to Lead: Grow and thrive in the role here.
Interested in sponsoring this newsletter? Check the sponsorship options here.
Take a look at the cool swag in the Engineering Leadership Store here.
Want to work with me? You can see all the options here.
Get in touch
You can find me on LinkedIn, X, YouTube, Bluesky, Instagram or Threads.
If you wish to make a request on particular topic you would like to read, you can send me an email to info@gregorojstersek.com.
This newsletter is funded by paid subscriptions from readers like yourself.
If you aren’t already, consider becoming a paid subscriber to receive the full experience!
You are more than welcome to find whatever interests you here and try it out in your particular case. Let me know how it went! Topics are normally about all things engineering related, leadership, management, developing scalable products, building teams etc.


Thank you, Gregor, for hosting me ⚡️